Overview
CanAirIO CLI (Command Line Interface) is an easy-to-use tool that allows you to configure your device through a console or web console. You don’t need a mobile phone or any special operating system - all you need is a browser (such as Chrome or Edge) or a serial terminal interface.
If you want using instead your mobile phone, please follow the next documentation here.
Launch the CLI
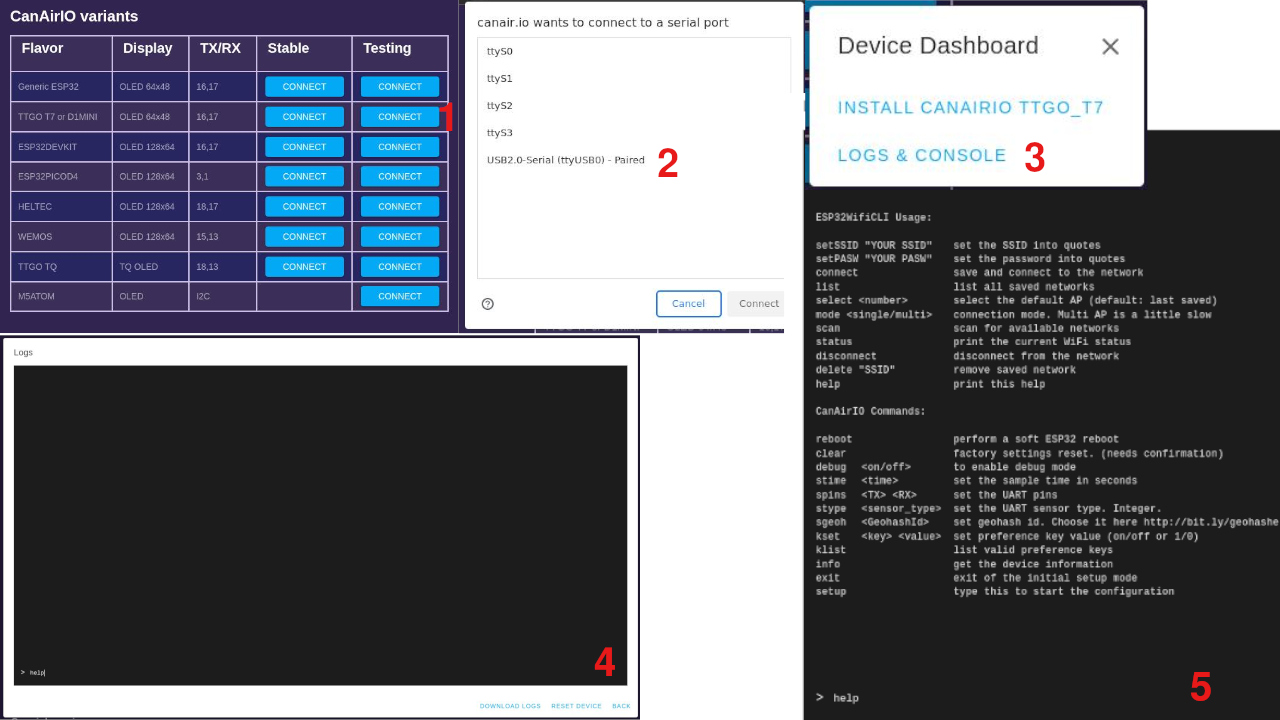
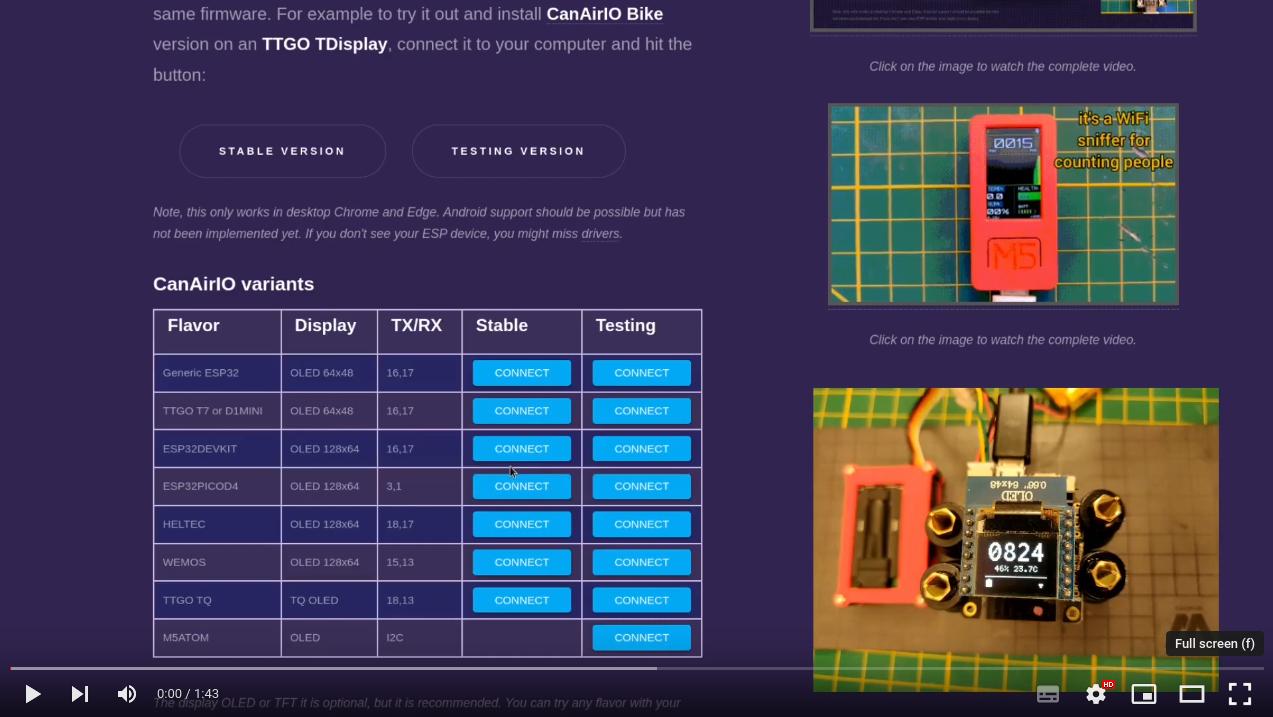
Using your browser please enter to our CanAirIO Web installer and following the next steps:
Video: (OLED configuration sample)
CLI main commands
ESP32WifiCLI Usage:

setSSID "YOUR SSID" set the SSID into quotes
setPASW "YOUR PASW" set the password into quotes
connect             save and connect to the network
list                list all saved networks
select <number>     select the default AP (default: last saved)
mode <single/multi> connection mode. Multi AP is a little slow
scan                scan for available networks
status              print the current WiFi status
disconnect          disconnect from the network
delete "SSID"       remove saved network
help                print this help

CanAirIO Commands:

reboot              perform a soft ESP32 reboot
clear               factory settings reset. (needs confirmation)
debug <on/off>      to enable debug mode
stime <time>        set the sample time in seconds
spins <TX> <RX>     set the UART pins
stype <sensor_type> set the UART sensor type. Integer.
sgeoh <GeohashId>   set geohash id. Choose it here http://bit.ly/geohashe
kset <key> <value>  set preference key value (e.g on/off or 1/0 or text)
klist               list valid preference keys
info                get the device information
exit                exit of the initial setup mode
setup               type this to start the configuration
Setup mode
This command show a brief of the current settings on the device like this:
Setup Mode. Main presets:

CanAirIO device id	: U33TTGOT7AA17A
Device factory id	: 5aa178
Sensor geohash id	: u33dc6s
WiFi current status	: connected
Sensor sample time 	: 240
UART sensor model 	: GENERIC
UART sensor TX pin	: 16
UART sensor RX pin	: 17
Current debug mode	: disabled

    KEYNAME 	DEFINED 	VALUE

    ======= 	======= 	=====
 wifiEnable 	custom  	true
  paxEnable 	default
  emoEnable 	default
    i2conly 	custom  	true
  altoffset 	default
    toffset 	default

Type "klist" for advanced settings
Type "help" for available commands details
Type "exit" for leave the safe mode
NOTE: Please keep in mind that you need set the WiFi and the Geohash (localization of your station) settings to have the station ready. These settings help to others to know the air quality in your zone. We have a cloud where you able to fetch all data via our API. Please see bellow for more details.
Safe mode
When the CanAirIO firmware starts up, there is a 10-second window during which we can write the setup command. This allows us to configure special settings before completing the boot process. If we write exit, the normal boot process will continue.
This setup is important because it allows us to check for any potential incompatibilities with our TX/RX pins, remove any problematic network connections, or fix any other settings that may be causing issues with the firmware. By addressing these issues during the setup process, we can ensure a smoother and more reliable boot process.
Sensor config
If you have a I2C sensor connected, CanAirIO should detect it automatically.
If you have a UART sensor connected to pre-configured UART pins for CanAirIO Sensor Library, you only should select the right model with the command stype like this:
st> stype 0
-->[CONF] sensor device type	: 0

selected UART sensor model	: GENERIC
Please reboot to changes apply
You able to list the possible sensor types using the stype without arguments:
st> stype
invalid UART sensor type! Choose one into 0-7:
0	GENERIC
1	GCJA5
2	SPS30
3	SDS011
4	MHZ19
5	CM1106
6	SAIRS8
7	IKEAVK
If you have your UART sensor connected to different pins, please use the command spins <TX> <RX> like this:
st> spins 16 17
-->[CONF] sensor UART TX/RX	: 16/17
Don’t forget reboot the device with each change to take the changes.
Debug mode
For try to understand more what happen with your device, you can enable the debug mode like this:
debug 1
For disable use debug 0 or debug off. You are able to write all commands over the current output at the same time. Don’t panic, only type and press enter to disable again the debug mode.
Fixed station config
If you want share your fixed station, you should have filled the next settings in the setup command output:
CanAirIO device id :
Sensor geohash id  :
For that please configure your localization of your air statation. For that please choose your Geohash using this page, and configure it using sgeoh command like this:
sgeoh u33dcd
If you want less precision set at least a geohash of 6 characters. More characters is more precision.
After that you should enable your WiFi, and after some minutes, your station should be in the CanAirIO map
WiFi setup
Quick guide: Use the commands: scan, setSSID, setPASW and connect for configure at least one WiFi in your device. You able to configure multiple host Ap. Please follow the next link for details.
CLI advanced commands
To show all variables possiblities, please run klist, for example:
    KEYNAME   DEFAULT  DEFINITION
    =======   =======  ==============================
 wifiEnable   true     turn on/off current WiFi network
  paxEnable   true     turn on/off PAX counter (WiFi sniffer)
  emoEnable   true     turn on/off Emoticons visualization (OLED)
    i2conly   false    turn on/off forced only i2c sensors (fast boot)
  altoffset   0        altitude offset to CO2 sensors
    toffset   0        temperature offset (positive float => substraction)
    tunit     0        temperature unit (Celsius, Fahrenheit, Kelvin)
debugEnable   false    turn on/off debug mode (verbose output)
flipVEnable   false    turn on/off flip vertical on OLED and TFT screens
homeaEnable   true     Home Assitant enable/disable
anaireEnable  true     Anaire cloid enable/disable
  ifxEnable   true     InfluxDb publication enable/disable
      ifxdb   canairio InfluxDb database
      ifxip   canairio IP address (default: canairio server)
      ifxpt   8086     port
     hassip   hassip   Home Assistant IP address
    hassusr   hassusr  Home Assistant username
    hasspsw   hasspsw  Home Assistant password
     hasspt   1883     Home Assistant port
   sealevel   1013.25  sea level value
fsafeEnable   true     fail safe enable/disable
wkrstEnable   false    wake up by reset button enable/disable
solarEnable   false    solar station mode enable/disable (experimental)
  deepSleep   0        solar station deep sleep time (experimental)
  geigerPin   -1       Geiger GPIO pin
For configure any variable please use the command kset following of value. Some examples:
kset homeaEnable 1
kset homeaEnable true
kset hassip 192.168.0.10
kset toffset 9.8
Some variables needs a reboot to perform the changes.
Troubleshooting
If your device enter on a panic loop, don’t forget type quickly the command setup to stop the normal boot. Sometimes this kind of panic loop is because some setting is wrong, for example wrong pins choosed for your UART sensor. Set these in the first setup or safe mode and reboot again.
We are able to help you in our Telegram channel too.